Friday, March 28, 2014

Friday Faves: Week 2

Welcome to the second installment of My Friday Faves, a weekly list of nouns that I'm currently all about.

1. Dry Shampoo

Ok, you doubters...I am not exaggerating when I say that I have the finest and most oily hair of all the land. It sucks....but I'll accept my crown because I can blow dry my hair in about 2 minutes, and for all of you lucky ones with beautiful hair, can not! Although I was dealt the short end of the stick in the hair department, I will not be bullied into washing my hair every single day.

I seriously can't live without the stuff. Even if I do wash my hair, I still use it the same day. Not only does it help with my oily hair (it's my version of a 5 o'clock shadow...seriously, by the end of the day, my hair is just gross), but it helps with volume, my other issue!

Let's start with the HOW before I get to the WHAT.

HOW: When I first started using dry shampoo, I would put it on my hair in the morning, like a chump! The best way to go about it is to spray it on right before you jump into bed. That way it works its way in over night, PLUS that white residue is totally gone by the morning...leaving you with nice, voluminous, oily-less locks.

WHAT: Now, there are two different kinds of dry shampoo (that I've used). Colored and Regular. When you have a choice, always go with colored. I mean, when you can add "root cover up" to its already well established repertoire, then by all means!

Favorite colored dry shampoo:

Bumble & Bumble


By far, hands down the best. It comes in black, brunette, red & blonde. But at $35 a bottle, it's a hard splurge. It is also hard to find (besides online) because only certain salons carry it. Lollie's is where I get mine in Norman.

Runner Up colored dry shampoo:

Batiste


At about $10 a bottle, this guy is a little easier to commit to. You can buy (if you're lucky and they're in stock) this brand at Ulta.

*When I do use colored dry shampoo, I use it in the mornings, otherwise you'll end up with a pillowcase that looks like it was dragged through the dirt!

Best Smelling Dry Shampoo:

Batiste Paisley


Batiste, and many other brands have different scented ones. At first I didn't care, but after having some really bad smelling ones, if I can't have colored dry shampoo, this is my next choice.


The Bad, The Ugly and The Don't Waste Your Money:


Typically, if I have to go with a brand, I like Sexy Hair...but for some reason their dry shampoo doesn't fit the bill. Honestly, I've only actually tried it a few times. I have bought at least 3 bottles, used it ONCE and the sprayer gets clogged and won't work. All three times! Fool me once....


Dove actually worked ok. But the smell is what earned its way to the bad list. Even Jake would complain about how bad it smelled. Pass!


Not surprisingly, Tresemme is on this list as well. The consistency of theirs was more wet than dry, and made my hair sticky.


2. Hardback Books

As much as we all know how much I love Pinterest and my Kindle, those can't replace pretty books! Especially design & decorating books, they are beautiful. They fancy up bookshelves, coffee tables and mantles across the globe. My amazon Wish List is 22 books deep and I keep finding new reasons to *reward* myself and buying a new one.

My favorites so far:


Domino: The Book of Decorating

This book has decorating tips for every nook and cranny in your home! In my mind, Domino can do no wrong.


Decorate

Decorate is a decorating nerds dream book. It has quotes, ideas and advice from every designer and decorator that you've looked up to + a lot more from people you've never heard of!


Young House Love

YHL started off as a blog that The Petersik's started when beginning their first house renovation. I personally connect with this book because of its DIY & budget aspect. They have 243 projects, all rated by budget and difficulty level.

Top of my Wish List (ya know...just in case you feel giving):


I have a little crush on him...I think he was the first designer I ever started "following".


The Perfectly Imperfect Home


3. Groop Dealz

Imagine if Etsy & Flash Sale Sites had a cute little baby....enter Groop Dealz. They've got boutique type clothing and accessories, home decor and everything in between...and it's all super cheap! Score!


Some of the things that I keep wanting to add to my cart are:


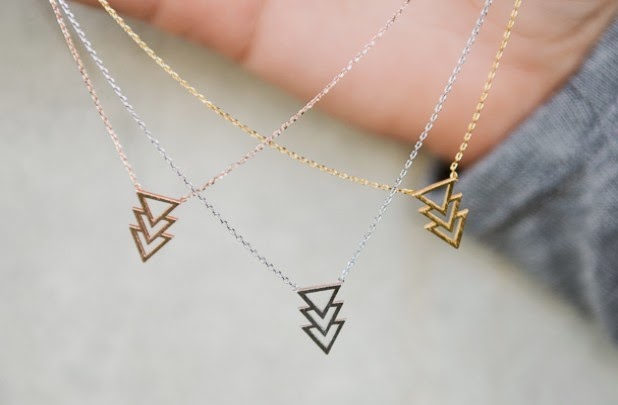
Dainty Triangle Necklace


Arrow Vinyl Decals
(Sold by Decomod Walls and are available in tons of colors!)


Sorry Not Sorry Tee
(Sold by Cents of Style)


Set of 3 Pillow Covers


4. Late night Pinterest Browsing

For those of you who do this before you fall asleep, you know that this is different from daytime Pinterest browsing. :) Everything is funnier or cuter to me, for some delirious, post melatonin induced state. I'm usually browsing pictures of english bulldogs OR looking through the E Cards. And then I wake Jake up every single time to show him what I've found. It's this new tradition that I'm starting...he is unaware because he'll wake up, look at the picture, laugh and comment and then drift off to sleep. With no recollection the next morning until I remind him. :)

Here are my faves from last night:


from Look Human


Smokenboo - if you love bullies, then you NEED to follow them on Instagram!!


 Welp guys, I'm joyfully off to Dallas...again. Two weekends in a row. This weekend Hil and I are going to see Chelsea Handler (!!!!!!) I can't contain my excitement! Can't wait to share our trip with you!


Wednesday, March 26, 2014

Wedding Blooms Part 1

Man, who else is just OBSESSED with flowers? I used to think that they were way overrated, you  know....back in the "baby's breath & red roses" were all you ever saw phase. But there has certainly been a wave of just beyond beautiful blooms (guys, that's a 3 pointer in Scatagories!) for not only weddings, but for the every day! If you follow me on Pinterest and you can just see how obsessed I am about Blooms.


I'll be sharing in Part 2 of this post (which can be found here) about how we came to the decision of DIYing our wedding blooms vs going with a professional and all of my feelings on that....BUT.... let me first state that flowers are beyond Valentine's Day...beyond weddings....and beyond what your hubby sends you as an "I'm Sorry".

Every time I see flowers, I personally feel refreshed and excited. They are just too dang pretty not to feel that way! There is a quote that I've always enjoyed by Audrey Hepburn...


I realize I 'm not talking about gardens here, but I think a lot can be said about plants. They do show a sign of hope and beauty. Traditionally, the reason brides even carry a bouquet was to symbolize fertility.

Here are some of my favorite updated uses for flowers...

They breathe new life into photo shoots....I don't know about you...but I CAN'T GET ENOUGH of floral crowns!
Photo by Ashley Sawtelle & Floral Crown by Bare Root Flora

I'm LOVING the idea of a Flower Bar. I first saw the idea on my friend's blog Rekindled Rentals when they styled this beauty.


Photo by my personal favorite photographer (ok, fine...it's because she was my wedding photographer....but after seeing this pic can you blame me?) Caroline Rentzel and Blooms from Poppy Lane Designs.

There are places like Dutch in OKC that have Flowers To Go that you need to take advantage of! These are not your grocery store flowers, people!
 

I finally had the chance to go by there a few weeks ago and picked me up some of my own blooms!


Please excuse my terrible iphone photo that isn't giving the flowers their true worth.


Then there are all those gorgeous bouquets we're seeing all over the place: and in my opinion, the bigger the bouquet the better. The bigger the bloom, the better the mom? The bigger the bouquet, the closer to God? Oh, those are taken? Well, I'll figure one out later.


Photography by Sarah Falugo and Bouquet by The Blue Carrot. This is obviously an extreme floral arrangement, but I'm digging it!

In Part 2 of this post, I'll share with you our reasons and process of DIYing our wedding flowers!

Happy Hump Day Ya'll!

Mal


Friday, March 21, 2014

Friday Faves: Week 1

In order to hold myself more responsible to my blog, I'm going to to start a Friday Faves Series. We all know how wonderful I did on my 300 New Recipes in 1 Year challenge...so wish me luck on this one! :)

So this time I going to try not to limit myself to a certain number, or a certain category. Just a day dedicated to my favorite things from people, to food, to colors and beyond.


#1. The Everygirl Career Profiles


This one kind of combines two favorites: the Career Profiles and Oh Joy! I first stumbled upon their career profiles when I was stalking Joy of OhJoy.com after I delightfully stumbled upon her new party & entertainment line for Target.


I mean, are you kidding me? Stalk worthy if I say so myself!!

Anyways, back to the career profiles....The Everygirl sits down with all sorts of women, whether they are designers like Joy, entrepreneurs, lawyers, small business owners, bloggers and even an Army Captain. They talk about how they got to where they are today, their daily struggles and asks their advice on the readers behalf.

It takes a lot of will power to turn my phone off at night and not to continue reading the next profile. I will finish them all one day though. If you are wanting, no, needing a new role model in a career or personal stance, you might want to take a gander!


#2. Workshops + Classes + Conferences.

 In my latest blog scouring adventures, I have seen so many workshops and classes being offered all over the world for just about everything you can think of! Those who know me know that I am/was NOT a school kind of gal. In high school, I was kind of a trouble maker/just kept talking...and talking kind of student. And in college....well, lets not rehash those days.....not until those debts have been paid.

A few years ago, my mom and I went to a workshop on how to refinish furniture by Allison of Refunk My Junk. It was so much fun! I made connections, friends and was taught the tricks of the trade! I was hooked. I love learning different ways that I can enhance my creative outlet.

Recently, I've stumbled upon The Influence Network. SO MUCH HAPPENING IN ONE SITE!! I seriously don't know where to start... I won't go into detail about everything they offer, but it is a such an awesome place! They are truly there to influence everyone....bloggers, moms, business woman, Christ followers, and everywhere in between. They offer conferences and classes. I have gone to two classes (hosted online, for $10) and they were really neat. They have offered classes for publishing books, on blogging, on how to get "unstuck", on being a mom, and so so much more!

My friend Taryn & I have signed up for a calligraphy class, taught by Lauren Essl of Blue Eye Brown Eye, hosted by Chirps and Cheers in Edmond.


I bought this one for myself as an early birthday gift. FYI: when you're married, apparently buying a gift for yourself and a gift from your husband are the "same thing" when they come from the same bank account...according to Jake anyways. LAME! I tried to Dave Ramsey the situation and convince him that it came out of my personal budget, but it was a rouse...and I was caught. That's ok...so worth it! :) I can't even tell you how excited I am for! April 6 can't get here soon enough!!

Things I'm wanting to learn, or take classes on in the future:
  • photoshop
  • photography (for the sake of better blog photos!)
  • sewing

#3. The Bobby Bones Show


Now that I have a job that requires me to be there at the same time everyday, I am more on a schedule. Including my radio. I listen to them every single morning. The Bobby Bones Show is really funny...they are just a bunch of friends who sit around and make fun of each other on the radio. Bobby is hilariously honest, a no BSer.

Every morning they have a segment where each person has to bring good news. It's an uplifting start to my day. It's what I look forward to every morning!


#4. Art Prints

I've bought way too many for my future gallery wall...ya know....the one that hasn't happened yet :)

Here are some of my faves from my fave shops:


from Scout Mob


from Lindsay Letters


from Shannon Kirsten


from SS Print Shop

and finally...


from Evelyn Henson


Well that covers it for my first installment of my Friday Faves!

See ya next week, if not before!

Mal


Thursday, March 20, 2014

DIY Confetti Packets

Lets talk wedding! MY wedding to be specific!

One of the many DIY projects for our wedding were the confetti packets our guests threw at us after we said "I DO".

{Wedding Photography by Caroline Rentzel Photography}


It was last minute. I had seen the idea on my Pinterest feed, but kind of late in our "planning game"; so I just brushed it off. Obviously that didn't work too well. I just HAD to have them! So, about 3 weeks before our wedding I'm making 220 confetti packs...PLUS checking off things on my already lengthy wedding to do list.

Here are the confetti packets that I had pinned for inspiration:


from Oh Lovely Day

and this one, from a wedding featured on 100 Layer Cake

I took a little of both and here is my final product!


What you'll need:
Washi Tape
Glitter card stock
Tissue Paper
Mylar
Card Stock
Glassine Bags
Avery Labels
Glue/Scrapbook tape runners


Step 1. Get your Confetti!


Now, you could buy prepackaged confetti instead of making your own...but I seriously couldn't find any that met my wedding standards. I did look on Etsy, and found some for sale there, but by the time I would have gotten it, it would have been cutting it WAY too close. So, I made my own!

You could also just use one type of paper, but since I was also considering how this endeavor would be photographed I thought various weights of paper would work best. That is why I used heavier paper (card stock) and lighter paper (mylar and tissue paper). 

I used my Cricut (for the first time in FOREVER!) and cut out 1/2", 1" and 1 1/2" circles out of various shades of gold glitter paper and various colors of card stock I bought from Hobby Lobby. Another thing that was impossible to find was two sided glitter card stock. I'm kind of embarrassed to say that I glued (using scrapbook tape runners) the glitter card stock together, so no white was showing. That's what I did for a week straight on my lunch breaks at work.

For the tissue paper, I knew that it was too light weight to run through the Cricut, so I used a 1" hole punch. It dulled out a lot, so I used wax paper to sharpen it. It worked most of the time, but I just say they need to make those puppies sharper! Come on, Martha!!

Mylar: I found it pretty difficult to find sheets of gold mylar. Both Michael's & Hob Lob were always out. So I got creative... At my bachelorette party, my sister had a photo booth backdrop made of fringed gold mylar. Luckily, I got the idea before she threw it way. I just cut the mylar confetti from that.


Me & Hillary at the party...a lot of hilarious things happened that night. Lets just say if you are ever in need of partner for a trivia game, DO NOT go with my sister Molly!

FYI: Organization was key for the confetti. Since it took me over a week to make all of the confetti, I couldn't just leave it out on the table, so I used my Birchbox boxes to separate the different kinds of confetti. To say those boxes are perfect would be an understatement!

Step 2. Washi Tape


I seriously have an obsession with washi tape! It is a game changer in my book. Before it got super popular I bought my washi tape from Cute Tape & Etsy. Now you can get it at Target, craft stores and office supply stores.

I had a few different things of gold washi tape lying around, so I used that and put a piece on the bottom of each glassine bag.Here is the back side of my bags....when doing yours, you'll need to keep in mind if your printing on yours to put the washi tape on the correct side of the bag. FYI..I tried printing and it kept smearing, I guess I don't have the correct kind of printer.


Step 3. Stuff Stuff Stuff!


I bought these  medium glassine bags from Cute Tape. My mom, sisters and I had little stuffing parties, adding a little of each kind in the bags.

Step 4. Labels


I designed the Avery labels on picmonkey, and then printed them off. I had to mess with the sizing of it for the circles. This part was a little frustrating, but after messing with the settings on my printer and consulting with an Avery customer service agent, I got the job done. Fold the bags over and place the sticker on the side with the washi tape showing.

Final product:


 Here are the pictures of our guests throwing confetti at us after we said "I DO"!


I don't regret adding the project at all. The pictures turned out awesome and the confetti landed on the dance floor...perfect way to start off our little celebration!


Related Posts Plugin for WordPress, Blogger...