Thursday, September 25, 2014

What We've Ate....Lately

I've been slightly lame in my cooking dinner game as well. These are to my own standards, of course. No one has given me flack (well, maybe my husband...just a little though). He has been our primary chef for the summer. It's not that we aren't cooking, we're just not cooking new recipes. Every once in a while, I'd sprinkle in a new little something, and here they are:


Jake's sis Emma first made these for us, and we are suckers for carnitas. It makes a lot...we'll easily be eating off this for weeks (freeze the meet you don't use the first week!). We used them for stuffed peppers the other night and they were FAB!


I made these for my family before an OU game a few weeks ago and they were a huge hit. Anytime I make enchiladas, I use green sauce, no matter what. Red sauce is usually too much for me, not heat wise, I just think the taste is very strong. But, my mom was making green chicken enchiladas, so I was stuck. I came across several and the only reason I picked these was because they didn't look too saucy. Yup...I judged this recipe by it's picture! I'm sure no one EVER does that :) Anyways...these were excellent! The chicken broth totally made the difference, the red sauce wasn't too strong at all. I'm going to pre-dip my tortilla every time in the future, it made such a difference and they did not dry out. Shocker...PW does it again!


Then there were these guys.... The recipe was OK...a little too sweet. My main issue was: HOW THE HECK DO YOU CUT A PEACH IN HALF?? Seriously...it was a disaster! Jake and I both tried and all the peaches ended up shredded. Next time I have a craving for baked fruit I'm just going to use my baked apples recipe and try out different fruits. 

Have a great weekend!

Thursday, September 18, 2014

DIY Dr. Who Terrarium


My friend Keith (you know...the great gift giver I've mentioned before) is a big Dr. Who fan. So, when his birthday came around I knew I wanted it to be Dr. Who themed. Never having watched the show myself, I went to Pinterest...what I lovingly refer to as "creative google" and typed in: Dr. Who gift ideas. This is what showed up...


I was sold immediately! The idea is from Blythe Ponytail Parades. She doesn't use real plants, and she makes her own tardis, which turned out way better than if I would have attempted it myself.

Here is a list of supplies you'll need:
Jar
plants
soil
rocks
tardis, or any other fun object you want to add!

If you are using real plants you will need to ventilate, so just keep that in mind when picking out your jar. When I went shopping for a jar, I saw the mason jar and thought it was perfect. Don't get me wrong, it looks cool, but you can't see the details like I would have liked.

First, you will clean out your jar and put rocks down at the bottom. Since I used real plants, I had to put to rocks at the bottom to help with drainage.


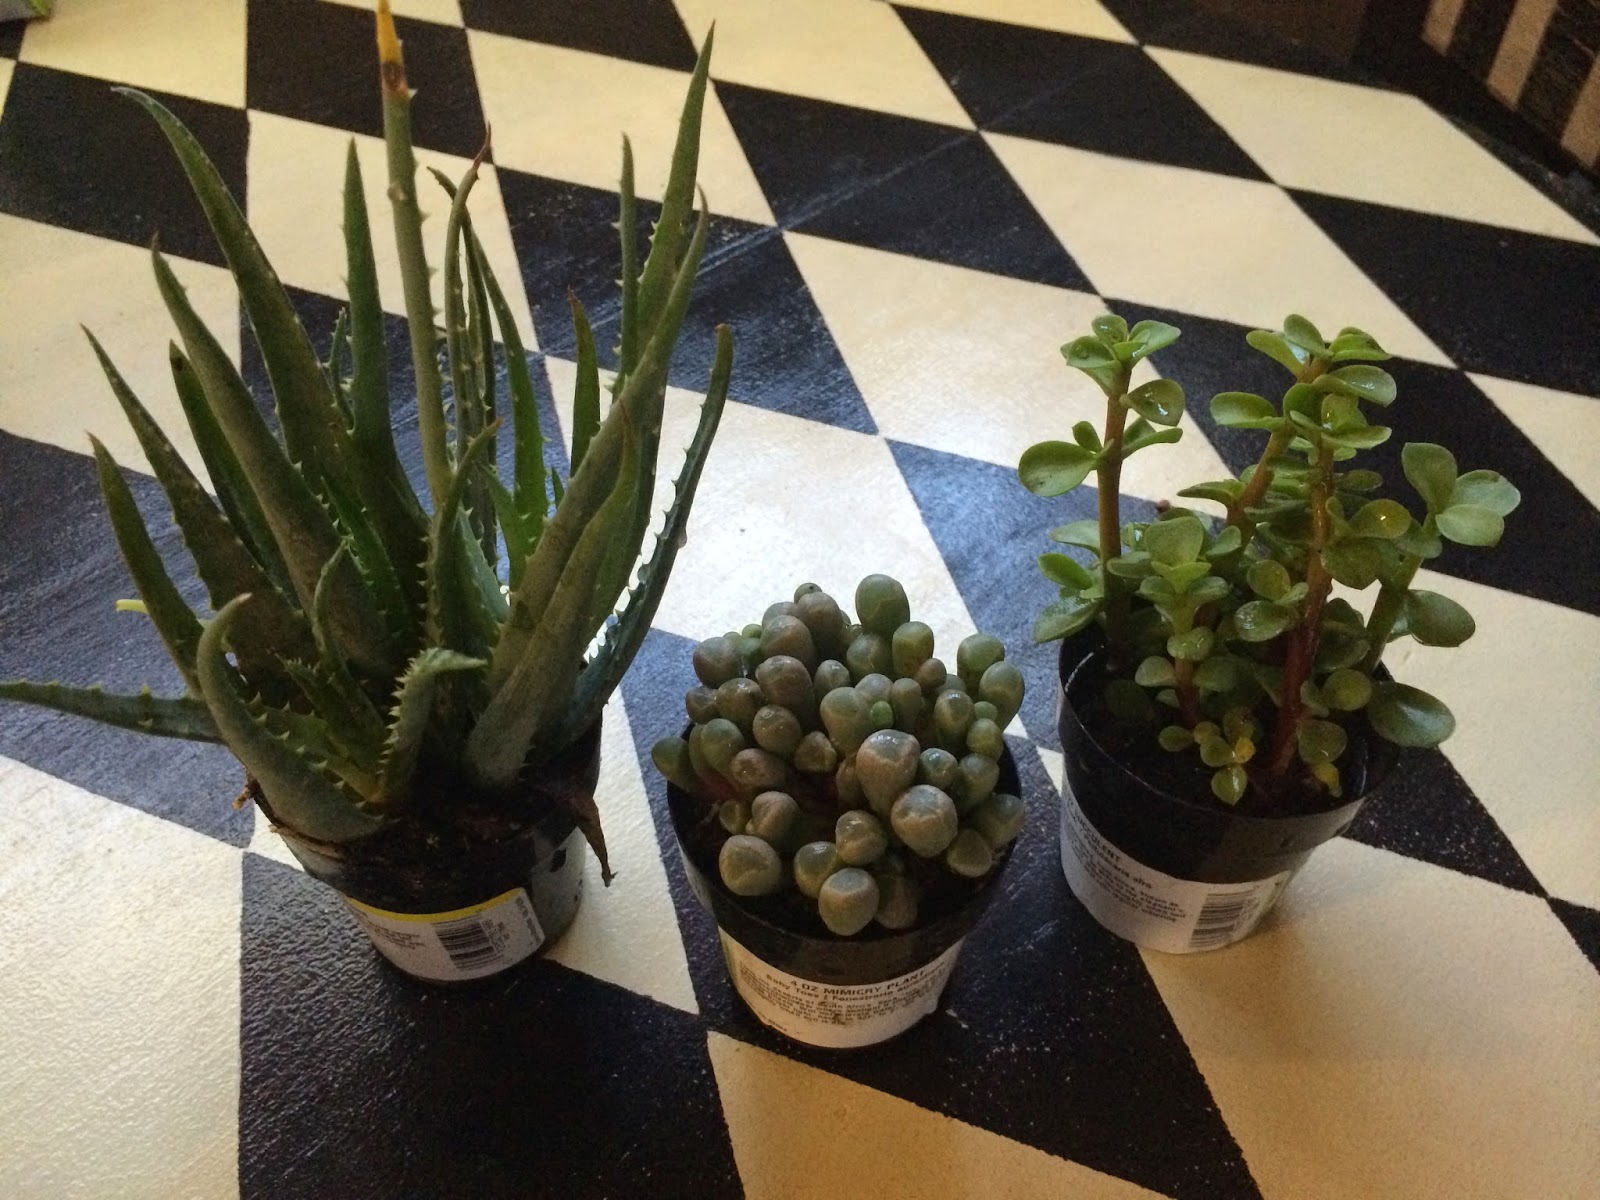
Then you are going to add the soil and your plants. I bought plants that were different heights so that it would create some depth.


My jar was too small for all three, so I planted my dad some aloe. He has the only green thumb in the family, so I'm not too worried about it's survival. I thought the middle succulent was so cool and creepy looking...I had to add it!


I then put a layer of rocks on top of the soil, and added in the tardis. I played around with the placement of everything and used a spoon to help move the soil and pack in down. Then I gave it a good watering and let it dry in the sun.


Instead of making my own tardis, I went to Hot Topic and bought a keychain. I had Jake take the chain off and we were good to go!


They sell these mason jar lids at Hobby Lobby and are PERFECT for letting the succulents breath. 


Jake thought this was so cool, so it looks like we'll be adding one in our home as well! Happy Birthday Keith...move to Oklahoma already! :)

Tuesday, September 16, 2014

Baby Shower for Mayson

A few weeks ago I traveled up to Tulsa to throw a baby shower for our wonderful friend Rachel! I've been friends with this girl for a long time...and I have traveled with her from Miami to San Diego and many places in between! She is my #1 OU travel buddy...and she just had a baby!!

Introducing Mayson Elizabeth! I think she looks like her dad, big time, in this pic!


Her shower was so sweet and extra fun because I got to throw it with a bunch of our college friends, so it was great getting to text with them all summer long about planning!


We ordered her invitations through T3Designs on Etsy.


We played a game where you take play-doh and "make a baby". It was hilarious, and a game I had never played before! We gave out prizes for ugliest, most realistic, funniest, etc. I won ugliest...Boom! :)


 Sweet & Salties recipe can be found here. 


Rachel allowed us to host the shower in her home. Lucky for us...Rach has a beautiful home! It is such a good idea too...you get to show off your new nursery and you don't have to haul the gifts anywhere!


 Rachel's SIL Allison provided these amazing gifts for everyone! Isn't this such a cool idea?


4 generations! Aren't they so cute? I'm so thankful that I got to be apart of this special day for Rachel!


Sunday, September 14, 2014

Sweet & Salties


I made these goodies for my friend Rachel's baby shower a few weeks ago.
I'll show more details about the shower on Tuesday....and guys, it was cute! Are you digging my calligraphy skills....I use about ANY EXCUSE to bust out my pens and ink :)

First you will need a bunch of bite size pretzels all spread out onto a baking sheet.

Then you will need to spend your whole life unwrapping 2 bags of Hershey Kisses. Ok, I may be exaggerating....but it took awhile. And Hugs are my favorite...and it was even harder to not eat any! I went with Hershey "Hugs" because I thought the white chocolate was prettier.


Top each pretzel with a Kiss, a Hug or a high five (is that a kind of Hershey ?) and pop them into the oven for 10 minutes, at 250 degrees.

After the 10 minutes you will place M&M's on top of the Hugs, pressing down slightly. You can find the single colors at The Candy Bin in Norman, or any specialty candy store (like the ones in the mall).

Quick and cute snack that are perfect for baby showers, or any party that you may need a color theme for! 

Thursday, September 11, 2014

Ashley's Surprise Party

Now that I've shared with you my main DIY projects of Ashley's Surprise Party, I'll share with you the rest of the details that happened that night.

First off, the invites. I decided I would give Paperless Post a go. What an awesome site! I'll warn you though...it is really easy to go haywire (the first time through I had racked up a bill of $70!) with all the different options; but they have a decent selection of free invites that are pretty nice. Here is what I sent out to everyone:

Aren't they cute? The e-vite concept has really stepped it up a notch! Forget the mass text of invites for future get togethers!

I really wanted this party to be all of her favorite things. Ashley doesn't like having to cut meat with a knife (hilarious) so Jake make kabobs...which turned out amazing. I filled the pinata with all of her favorite candies: kit kat, rolos, twix, gummy bears, swedish fish and sour patch kids. Ashley is also OBSESSED with popcorn. She has told me that there are many nights when that is her dinner! So I made a few different variations of popcorn mix. I did a Garlic Rosemary Parmesan Popcorn mix and a S'mores mix. I also made this White Chocolate Raspberry Bundt Cake.


This was my first time using my white calligraphy ink...I was pretty pumped :) 


We also had a few people bring some desserts as well, which were all amazing. It was a very indulgent night!

My favorite part of the night was the sno cone machine!! You read right...a sno cone machine! We had decided a few weeks prior to rent one, and guys... that is a party game changer! Seriously....best thing ever! I need a sno cone machine very badly! It was such a fun addition to our party and was a huge hit!

That, along with some fun games made the night complete and Ashley's birthday celebration was a complete success! It was such a great night and always fun when a group of friends can just relax, eat a ton, catch up and play games that you haven't played since college!


Tuesday, September 9, 2014

DIY Popsicle Pinata

I have been obsessed with all the DIY pinatas from the beginning of time (Pinterest time that is...). Kelly from Studio DIY has the biggest collection of pinatas on her site. I'm pretty sure that is one happy office she works in.

I have been wanting an excuse to make a pinata for awhile now. No, I did not throw Ashley's Surprise Party JUST to make the pinata...but it was close. :)

I decided on a Popsicle shape for 2 reasons: 1. It was an easy shape. 2. It was a "dessert themed" party, and by themed, I mean we had A LOT of dessert :)

OK, so what you will need to make your own ginormous Popsicle pinata is:
cardboard
tissue paper/ crepe paper
glue
string (I used jute)
wire
x-acto knife
packaging tape

First I got my cardboard and drew a Popsicle shape onto 2 of my big sheets of cardboard.


I then used my knife and cut those two shapes out, as well as several long, 6" wide strips for the sides. I also cut the "stick" for my Popsicle.

Next you will want to put together your shape. I read a few different tutorials, and some people used glue and some people used tape. I chose tape because I felt like the wait to for the glue to dry would be too long and not sturdy enough. I just taped that sucker up. The shape didn't have to be perfect, just because I knew I could create a better shape with the tissue paper. When doing the sides, I would just bend my cardboard strips to make them as flexible as possible for the top curve.

Once your shape is taped together, you will want to cut a strip in the bottom of the Popsicle for the stick.Then you will next to receive flak from your husband about your new "tombstone" pinata. :)


Now you will want to cut all your strips of tissue paper. Like I stated in the DIY Party Hat post, I really tried to use what I have. If I could have chosen, I would have used crepe paper...but I still have a ton from the wedding, so that is what I used. Crepe paper would have been better because it is already cut into long strips. You will just cut a lot of strips, about 5" wide. I then folded each strip in half, and cut my fringe.


I chose to do an ombre pinata (duh) so I made markings on the cardboard as to where I would start each color.

Now, you just start from the bottom up! Its a little time consuming, but this is when I catch up on The Tonight Show. The top was a little weird, but I just kept adding more of the dark pink in smaller strips so no cardboard showed.

Before you cover up all of the sides, I cut a flap so that we could add the candy. I also went ahead added my wire to the top, so that we could hang it from a tree. Make sure to reinforce that part!

Next I put gray tissue paper on the stick and glued that into it's slit in the bottom.

Now just add your candy and hang that sucker Popsicle from a tree and let your friends hit away :) It was pretty fun channeling our inner child. 


Related Posts Plugin for WordPress, Blogger...